GA4 migration guide: how to, steps, metrics, and more

In the fall of 2022, Google announced they were officially migrating their Universal Analytics (UA) platform to their new version of Google Analytics, best known as GA4. We have until July 1st, 2023, to make the switch, and with this announcement, they made it clear that this is not a typical software update… No, this will be a step-by-step process, meaning we need to make the switch ourselves - fun stuff, eh?
We created this GA4 migration guide to help you transfer your properties, step by step, with screenshots. We also added some sweet info, like comparative metrics, best practices, etc. Let's dive into it!
Table of contents
- Introduction to this guide
- GA4 properties
- Comparative metrics between UA and GA4
- Creating GA4 data in DashThis best practices
- Comparing your data results between GA4 and DashThis
- What will happen with my data after the sunset?
- Guide conclusion + list of resources
Introduction to this guide
Since the big announcement, many businesses in the digital marketing world have been putting it off, but why? Well, to start, your ga4 configuration needs to be done manually and until further notice, you will need to convert your ua property to ga4. Secondly, GA4 has a new interface that will require some time to get used to, especially for those just getting comfortable with Universal.
Data is collected via an event-based model now, and new reports, such as e-commerce tracking, come with that. Some metrics and dimensions have vanished, and new ones have been added. Additionally, new methods for data collection have been introduced to help better track conversion paths, data retention, and more - I mean, when you think about it, this is exciting as we are all being introduced to what some call ‘’the future of analytics’’.🚀
Back to the migration process, if we’re honest with each other, this will require some work; we can’t deny that, but, let’s face it, we will have to make the transition one day or another, right?
So, let’s start the new year off on the right foot together and go for the change.
With all of this being said, what can DashThis do for you? We can start by helping you understand what needs to be done. In this guide, we will focus on answering your questions such as,‘’ where do I start?’’, ‘’how do I create a new property in ga4’’, ‘’where and how do I create my new data in my dashboard?’’, ‘’what are DashThis's best practices?’’, ‘’which GA4 metrics can I choose to replace the ones from my analytics platform?’’
GA4 properties
2.1. Benefits of creating your properties now
A good place to start before migrating is to consider some of the key benefits of creating your new properties:
- Become familiar sooner with the new platform
- Track both your web and app together or separately with the new data stream feature
- Improve understanding of your audience with enhanced measurement based on events
- - These GA4 events are automatically tracked and logged on certain predefined user activities. For example, Page Views, Scrolls, Outbound Clicks, Site Search, Video engagement, and File downloads.
- View a new set of accurate engagement metrics
- - Engaged Sessions
- - Engagement Rate
- - Engaged Sessions per user
- - Average engagement time
- Improve your understanding of customer purchase journeys across platforms
- Use GA4’s provided exploration report templates for advanced data analysis
- Use the Analytics Intelligence search bar to understand report insights better
- Create your GA4 properties now, and when the time comes to sunset, you will collect a reasonable minimum number of lifecycle data.
After carefully reviewing these new benefits and getting comfortable with the new measurements offered, you may rethink some of your business goals which may bring you to create new targeting strategies. Still, you have the time to do this before the scheduled sunset.
2.2. How to update to GA4 and create a new property ✨
Making the switch from UA to GA4 doesn’t have to be complicated. It’s a pretty straightforward process. If you want to view these steps on video, we recommend watching this recording made by Julius from AnalyticsMania.
1. Log into your Universal account
2. Click Admin (bottom left-hand side)
3. You can then choose GA4 Setup Assistant or simply + Create Property. For this process, we will click on + Create property
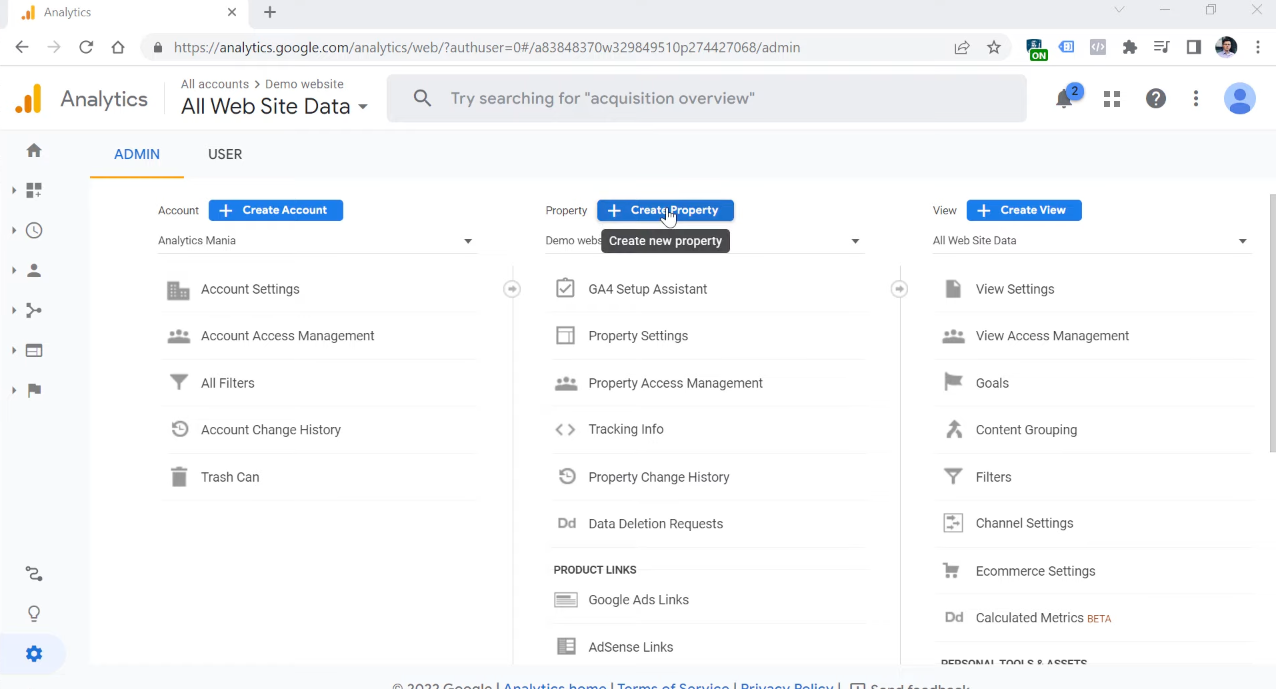
4. Enter the property name + Select reporting time zone and currency, then click on Next
Important: Note your GA4 property's name to find it later. If your Universal Analytics property name is "Example property (UA-nnnnnnn)", your GA4 property name will be "Example property - GA4 (xxxxxxx)", without a "UA-" prefix, and where xxxxxxx is a new property number.
5. Then, answer some questions about your business (this step is optional)
6. Click Create
7. The next step will be to configure your data stream.
Data streams are new, but this is what allows you to track website and app data.
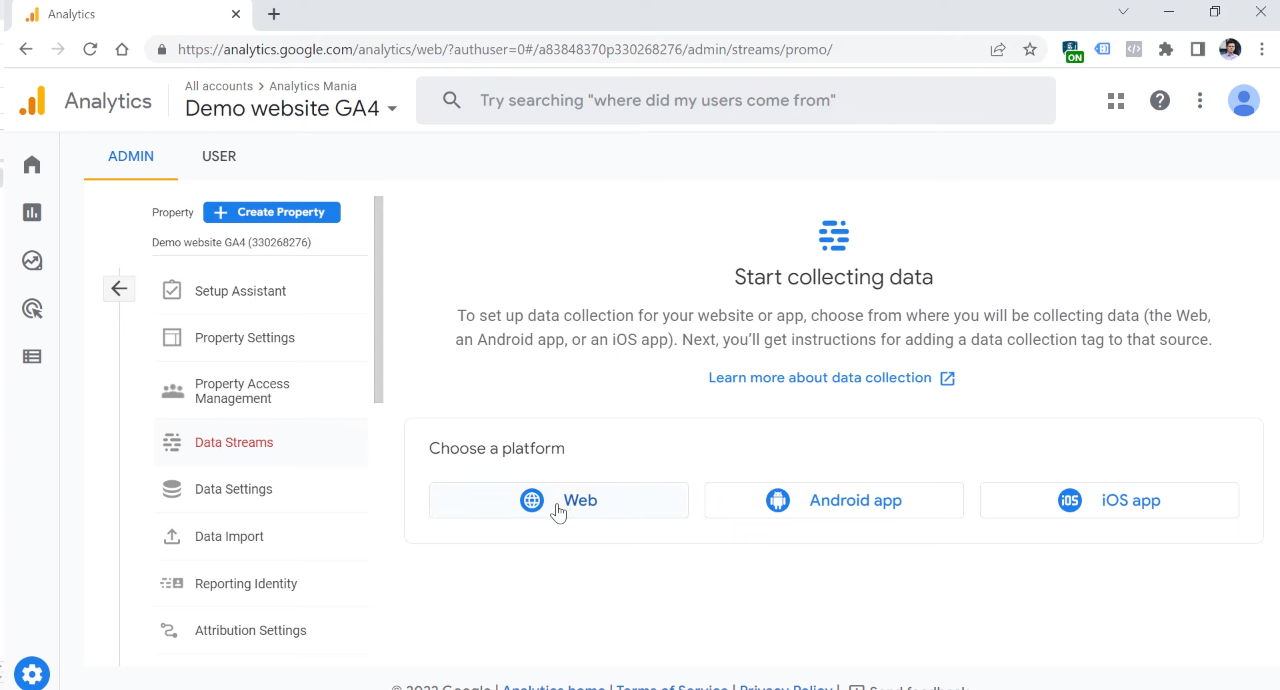
8. Select the web platform and enter your site URL and stream name
-
- Your stream name should include the keyword ‘’website’’ to see which property you have created easily
9. Once completed, your web stream details will appear, containing your measurement ID.
10. The final and most crucial step is to tag your measurement ID to your website. There are a few options for doing this:
-
- Option 1. Via your content management system settings (requires Google Analytics 4 integration)
- Option 2. Using google tag manager (GTM)
- Option 3. By adding the Javascript tracking code in the header section of your website (gtag.js)
Congratulations! You’ve successfully created a new GA4 property 🙌 - If any issue occurred at any of the steps mentioned above, please contact a Google Specialist.
A few things to consider:
- Data can take up to 30 minutes to appear in your new GA4 property. To verify that data is being collected, Google suggests you browse your website and select Realtime from the report navigation. You should see activity in the Realtime report.
Comparative metrics between UA and GA4
We’ve talked about the benefits of creating new properties and how to create them, now, let’s talk about metrics. By now, you know that GA4 is an event-based data model where every activity performed by the user is considered an event. Let's compare the new Google Analytics to the old one. We see that a lot has changed when it comes to collecting user data but what hasn’t changed is this powerful event tracking tool is still designed to help you understand WHO is looking at your site or app, HOW they got there, and WHAT they are doing on your site or app - just more accurately than Universal did.👌
In Universal, a session is combined with pageviews, ua events, and transactions completed by a user within a given period. GA4, on the other hand, doesn’t limit sessions by time, and with this comes new engagement metrics. Keep in mind that you can still see session data in GA4. Still, Google Analytics now collects and stores user interactions with your website or app in a way that is more flexible in predicting user behaviors.
In DashThis, it will be challenging to report the same metrics from Universal to GA4 in your dashboards because of all the changes with metrics that are no longer being measured the same way. As a result of this, and as mentioned previously, some metrics no longer exist, and others will depend on your events created in GA4. For example, goals are now replaced by conversion events, so, there won’t be a comparative metric.
Below, you will find a list of specific categories that contain popular metrics from UA and which ones you can use in GA4.
And here's the list of the most popular dimensions from UA and their alternative in GA4:
This list can also be found directly in your dashboard: Sign in to your account > create or access an existing dashboard with a GA4 source > click on the custom widget drop-down menu > click on the tooltip beside Google Analytics 4 and take a look at our list ![]()
Don’t have an account? Give DashThis a try and start a free trial today.
Please note that we will discuss comparative dimensions, custom dimensions, and filters in an updated GA4 blog post in the spring. Stay tuned in by signing up for our monthly newsletter!
Have any questions about UA / GA4 metrics or can’t find your GA4 metric in DashThis? Contact our Customer Success Team.
Creating GA4 data in DashThis best practice 💡
Additionally, our marketing team has created a preset template that may be useful if you create a new dashboard with only GA4 data called GA4 Report Template. This report will provide data on traffic overview, conversions, and a section for your transactions.
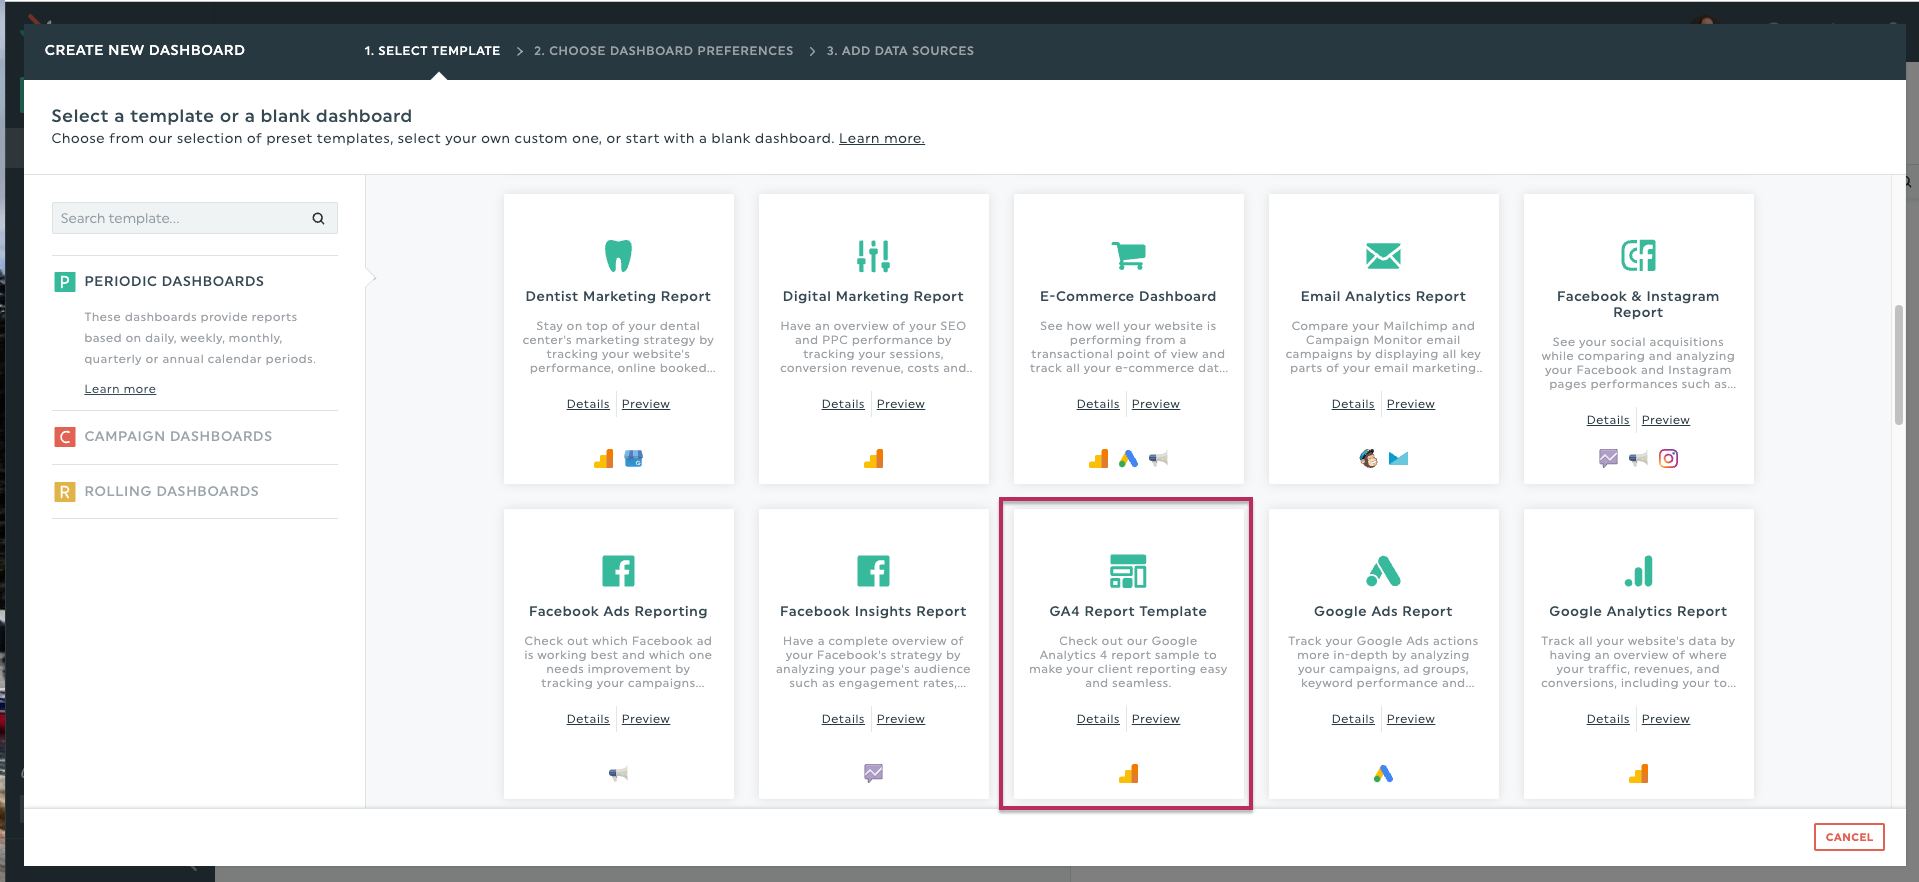
If you choose to create a dashboard from scratch, it would probably be best to keep universal analytics and google analytics 4 data separate so it is less confusing for your customer to read their report.
‘’But what if I want to compare UA metrics with GA4 for my customer to see?’’
You can still do this, especially if you are running your properties in parallel between UA and GA4, then this next part is for you:
You can show how you collect data in UA and GA4 within the same dashboard to your customer in a few different ways. If you decide to do this, it would be better to keep all of your comparative data within the same dashboard so your customer can stay on the same report instead of clicking on another one.
In the example below, we will look at three options using a historic widget with the user metric:
- Option 1 - Create a UA metric, and right beside that widget, add the GA4 comparative metric widget (if applicable)
- Pro tips:
- Keep the same graph types when comparing data
- Add in your widget title which integration the data comes from (For example, UA and GA4)
- Pro tips:
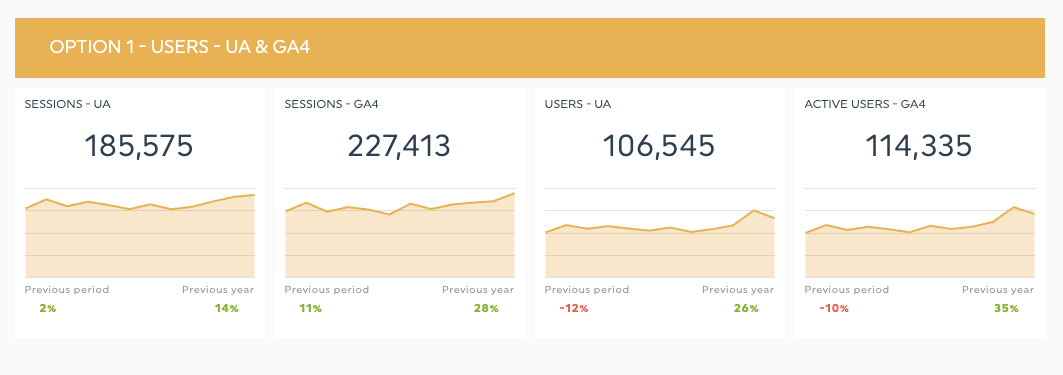
- Option 2 - Some users like to represent their data in a vertical row. In this case, you can create a single row of UA metrics and then on the row below, create the comparative metric for GA4
- Pro tips:
- Keep the same graph types when comparing data
- Add in your widget title which integration the data comes from (For example, UA and GA4)
- Keep the comparative widgets close together (ideally, one above the other)
- Pro tips:
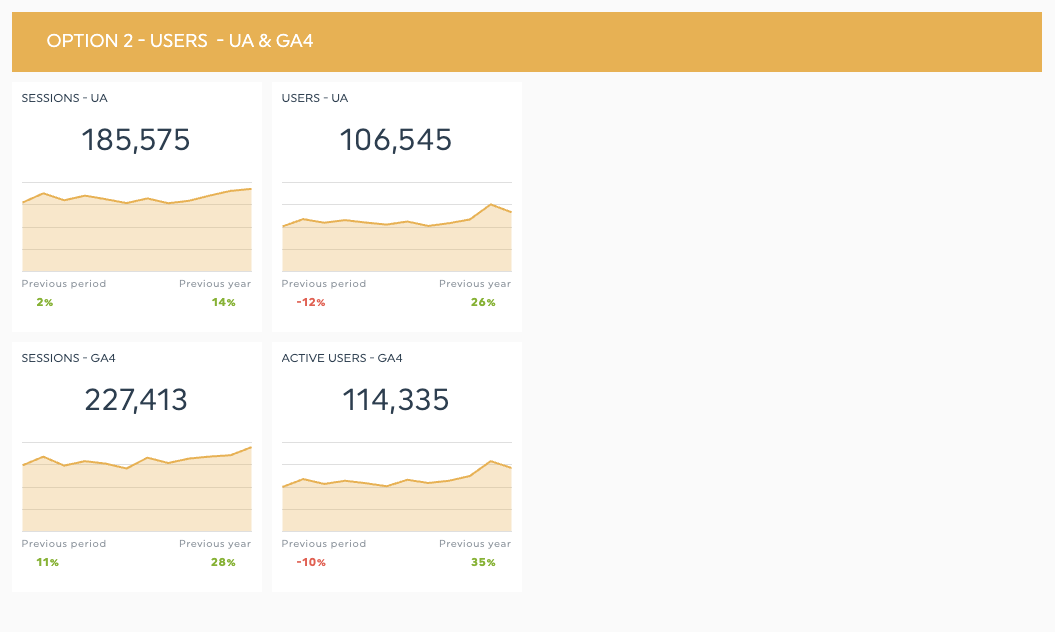
- Option 3 - Create a section dedicated uniquely to UA data, and below that section, create a new one with GA4 data
- Pro tips:
- Specify in the title of your header which integration the data is coming from
- Keep the same graph types when comparing data
- You can change the widget titles if you like, but not necessary
- Pro tips:
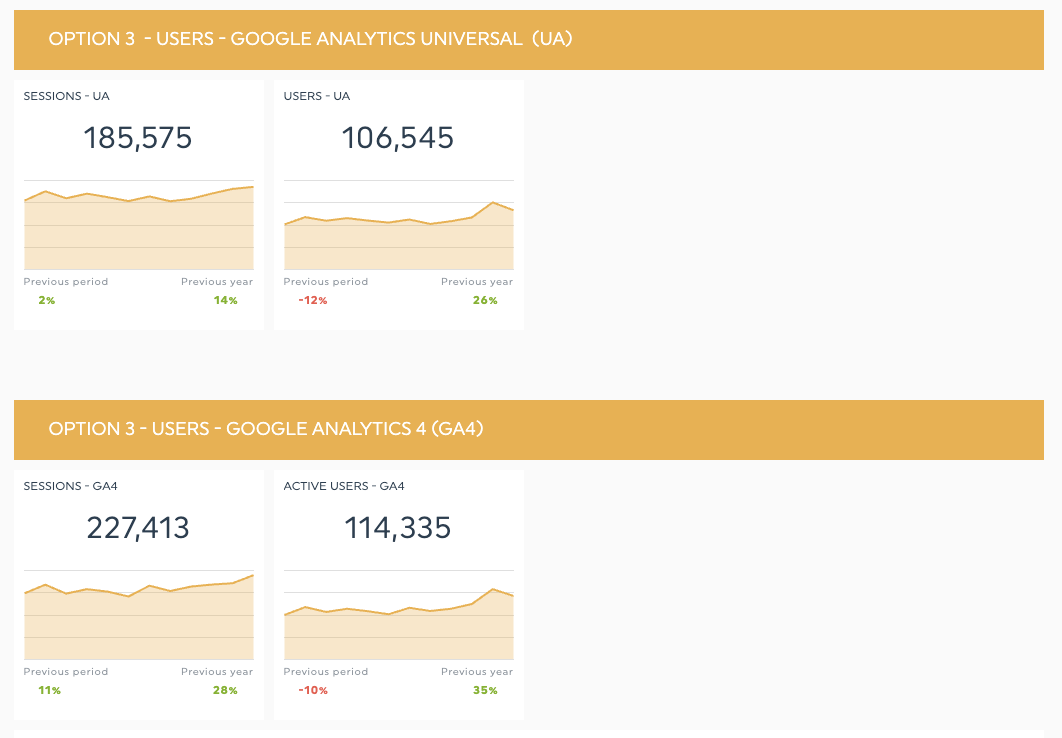
Want to see what this looks like in a dashboard? No problem! Keep in mind that you will be viewing the last completed monthly period. Take a look here: view dashboard.
Important: A good thing to remember when creating GA4 widgets is quotas. What are they? Well, to explain this in the least technical way possible: Google installed quota limits to prevent the system from crashing if ever too much data is being pulled in simultaneously. This rule applies to everyone with a website plugged into GA4, and unfortunately, there's no cheating - we need to be patient. So, when you see a widget in DashThis displaying the message ‘’quota reached’’, this is a good example of Google saying, ‘’hey, you are fetching too much data right now; we need to wait a bit'’ - but on the bright side, DashThis will tell you exactly when to come back and check your data results 😊
To know more about this, check out the Google developer page on Limits and Quotas on API Requests.
Comparing data results between GA4 and DashThis
Once you’ve successfully migrated, created your new property, and created your widgets in your dashboard, how you compare your data results in DashThis hasn’t changed. It’s the same method as if you are comparing UA data.
Open your Google Analytics 4 account. By default, you will land on the home page, which is very limited, so you might want to click on ‘’reports’’ in the left-hand menu.
What is excellent about the reports page is that it gives you an overall view of your users, engagement time, revenue, retention report, top conversions, top-selling products, etc. If a report catches your eye the most and you want to dig deeper into it, you can click on the hyperlinked shortcuts, which will appear in the bottom right of the report starting with ‘’View’’, click on this, and it will bring you directly to this overall report. For example, below,
WHERE DO YOUR NEW USERS COME FROM?
Click on: View user acquisition
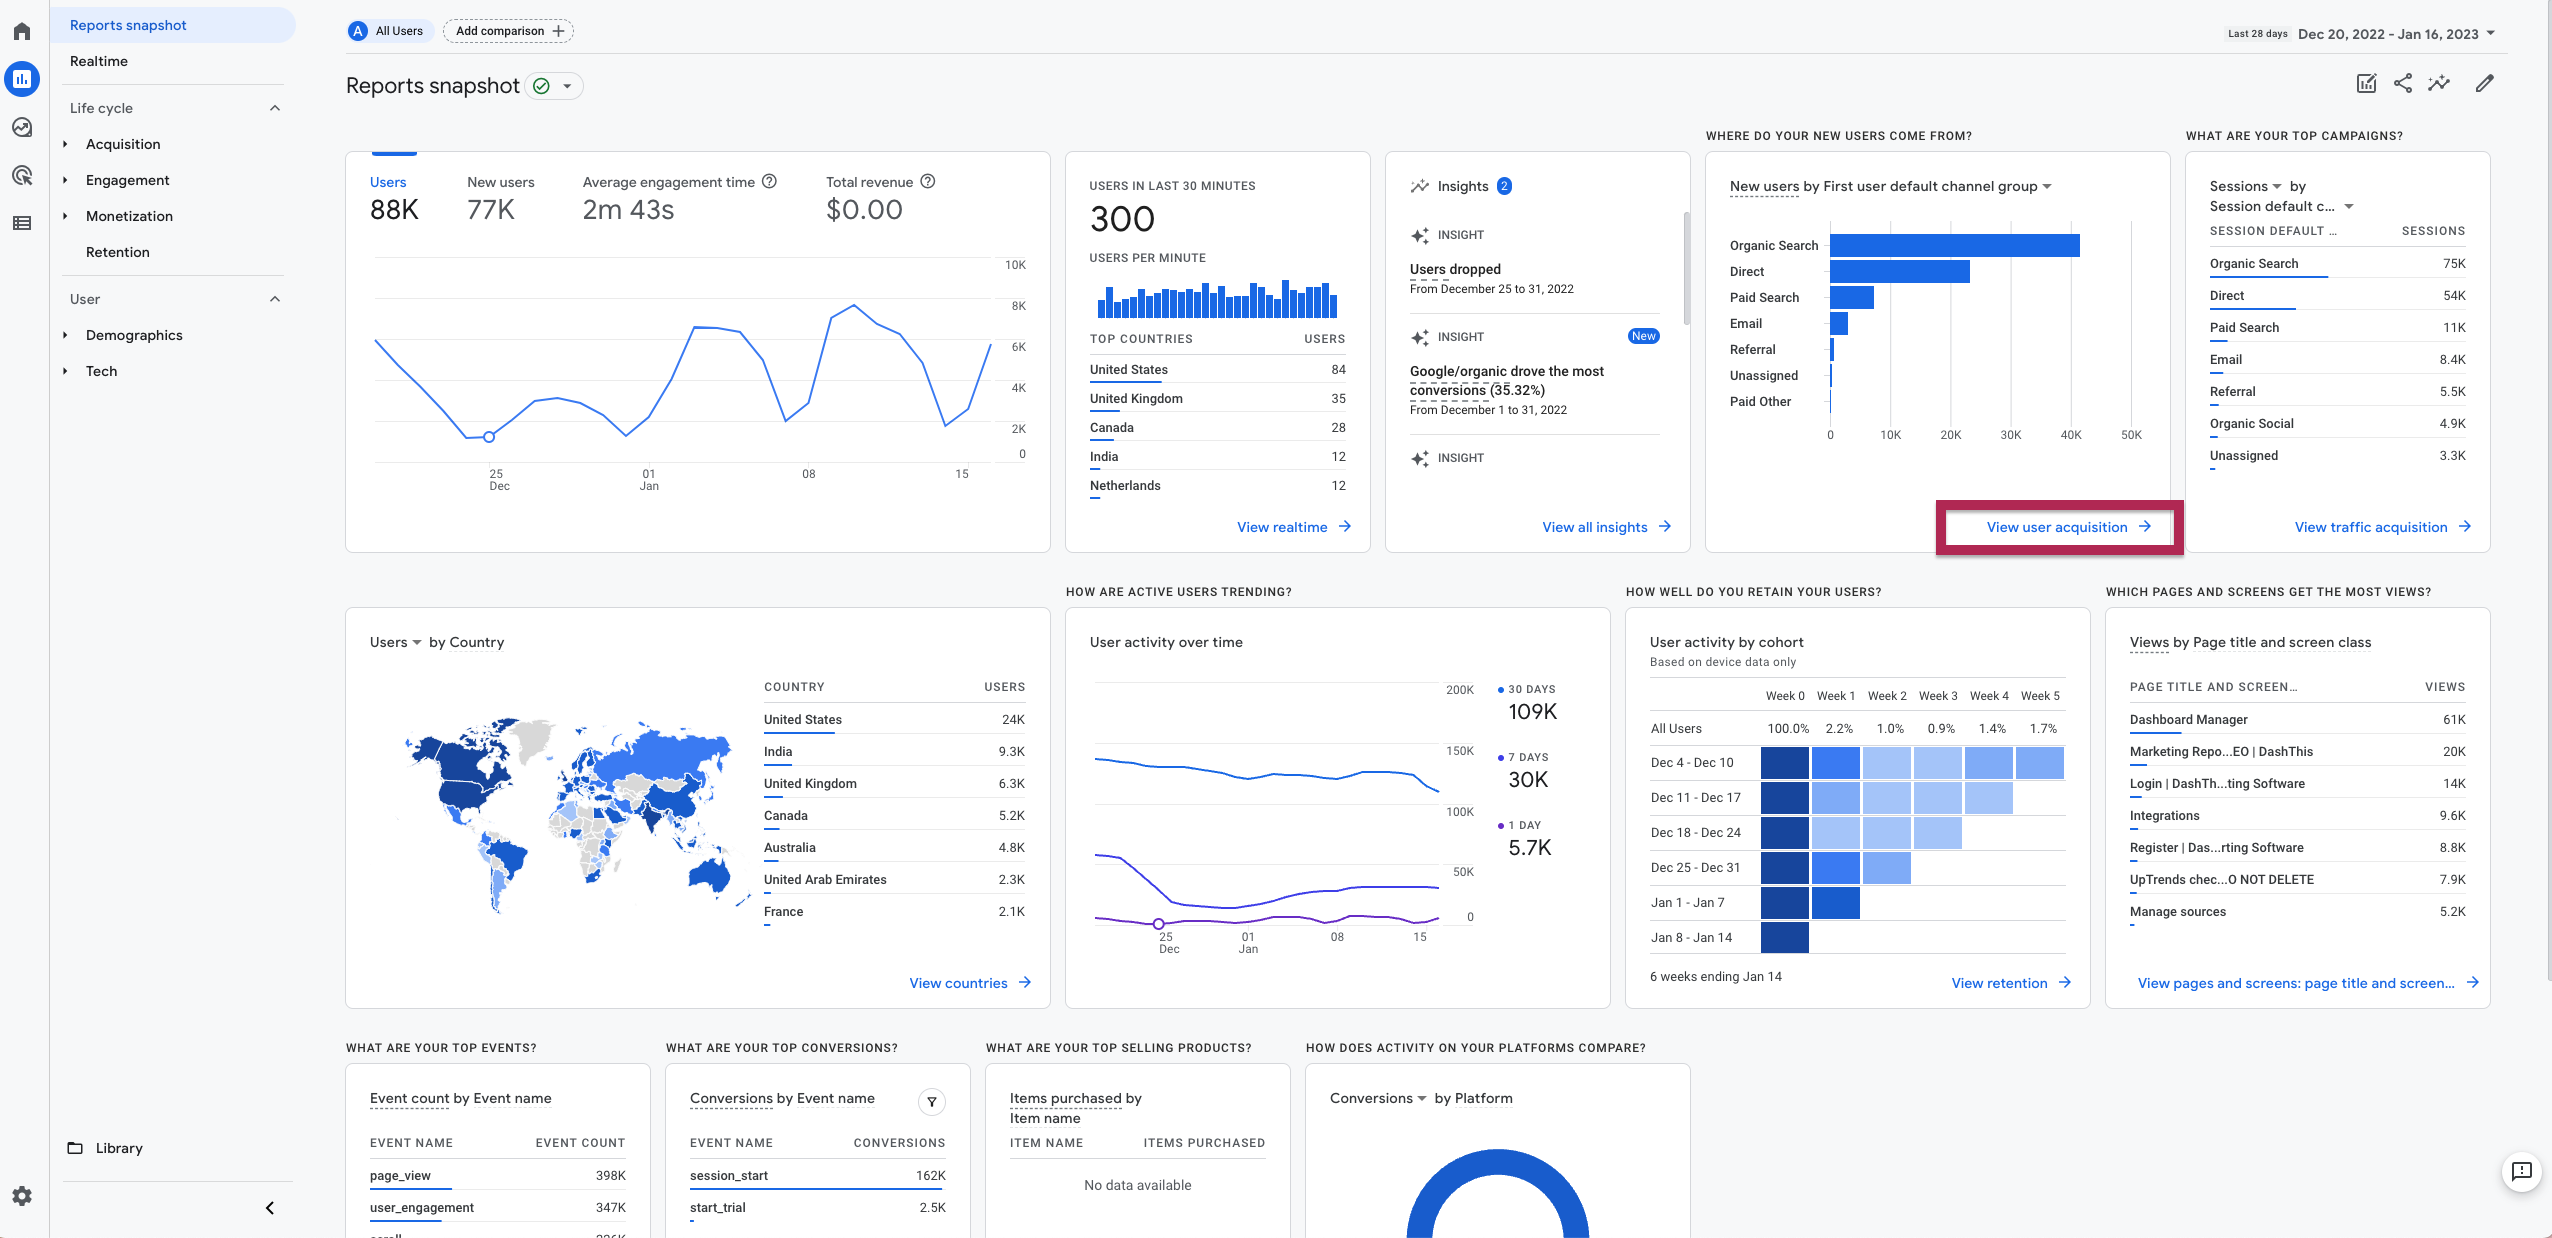
Now with that being shown to you, how do we compare our data in DashThis? In the example below, we will compare our Active users for the completed monthly period of December 2022.

A couple of things to consider:
- Make sure you are in the correct google analytics 4 account.
- Make sure you are comparing the same dates. (In GA4, top right-hand corner) (In DashThis, top center of your dashboard)
- Make sure that the metric in GA4 corresponds to the same metric in DashThis.
What will happen with my data after the sunset? 🌇
DashThis is actively monitoring the sunset of google analytics universal. At this time, it is said Google will stop data collection of ua properties by the 1st of July 2023. However, we will still be able to retrieve ua data 6 months after the sunset date. This means that DashThis will still be able to display ua data within your dashboards until Google stops reporting it. Keep in mind that at any time, this can change on Google’s side. You can manually download data from every report if you need to save certain information beyond Google's 6-month data-retention grace period.
To export:
- Go to your Universal account
- Click on any report
- At the top right-hand corner, choose your date range and click apply
- Click on ‘’export’’ and select the file format
Guide conclusion + list of resources:
We hope this guide will help you smooth your migration process between Google Analytics Universal and GA4 and, most importantly, give you insights on how to report this new interesting data within your DashThis reports.
Stay tuned for an updated GA4 blog post focusing on dimensions, custom dimensions, filters, and DashThis best practices!
Until then, should you have any questions about your DashThis reporting, please get in touch with our Customer Success Team.
Also, please find below a list of resources that may be helpful to you:
- Official Google Announcement
- Essential migration steps directly from Google
- GA4 metrics and dimensions
- Limitations and event collection limits
- Default events
- Recommended events
- Book an appointment with a Google Specialist
- Google Analytics 4 account training guide and support
Happy reporting! 📈
DashThis team
Ready to create a GA4 report with Dashthis?
Read More

Don’t miss out!
Automate your reports!
Bring all your marketing data into one automated report.
Try dashthis for free
